Large Language Models have changed the way we interact with technology by allowing computers to understand and generate human-like text.
You might think that building your own LLM application is only for large organizations with a lot of resources. The reality is that while training an LLM from scratch requires a vast amount of resources, building an application using an LLM is much more accessible for beginners today.
For most complex applications, you won’t even need to train the model from the start. Using pre trained models or fine running them for your specific needs is often a more practical and resource efficient approach.
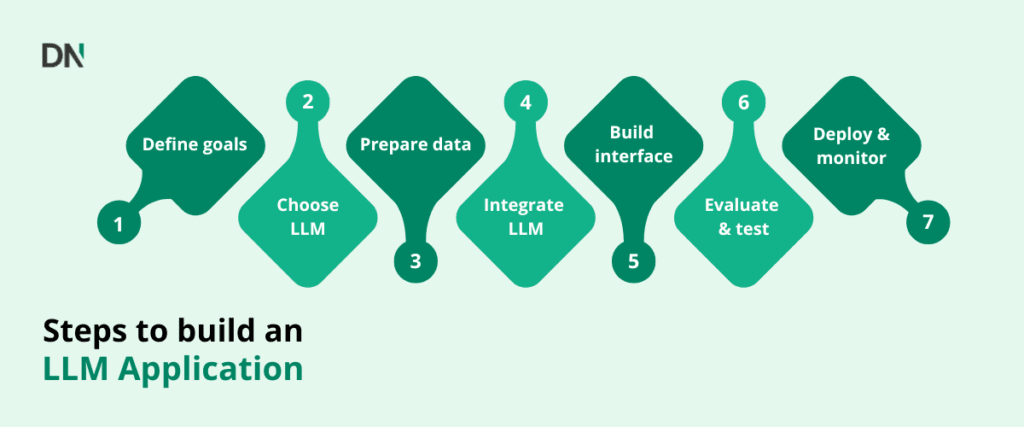
Step 1: Define your goals and use case
The very first step is figuring out what you want your LLM to do. What is the purpose of your application? What complex tasks should the LLM help with?
Defining your goal will influence your future decisions such as the type of LLM you should use and the high quality data you might need.
Step 2: Choose an LLM
Once you know the purpose of your application, you have three main choices for how to power it with an LLM:
- Use a pre-trained model: This is the most straightforward and cost-effective option. You leverage a model that has already been trained on a vast general dataset, and you simply use it for inference (making predictions) without any further training. This requires the least amount of computational resources and data, as you’re not performing any learning.
- Use a pre-trained model and fine-tune it: This approach involves taking a pre-trained model and training it further on a smaller, more specific dataset relevant to your particular use case. Fine-tuning allows the model to become highly proficient at a specialized task or within a specific domain. This requires more computation than using a pre-trained model as is, but significantly less than training from scratch.
- Train a model from scratch: This option is generally not advised for most applications. It involves building and training an LLM from the ground up, starting with randomly initialized weights. This process demands massive amounts of computational power and data, and it introduces numerous potential pitfalls. Pre-trained models are almost always used as the base for fine-tuning, as they provide a strong foundation of general knowledge, saving immense resources and effort.
Note: Platforms like Hugging Face offer a wide variety of open source pre-trained models and tools for fine tuning. Libraries like PyTorch and TensorFlow provide an extensive library of tools for working with these models.
Step 3: Prepare your data
Depending on your chosen LLM strategy, it’s important to have a data preparation step.
If you are fine tuning a model, you will need to gather a dataset specific to your task or domain. The quality of this data is crucial to have a good performance. This involves collecting relevant text, cleaning it and potentially formatting or annotating.
If you are using pre-trained models, you still need to think about the input data your application will provide to the LLM. This data should be relevant and well-formatted so that the transformer architecture can process the information effectively.
Step 4: Integrate the LLM
Now that you have chosen or prepared your LLM, you need to connect it to your application. This is often done by setting up an API.
Many model providers offer APIs to access their LLMs. If you are using a fine tuned open source model, you would set up an API endpoint to serve your model. When using pre-trained models, the endpoint is usually supplied by the designated provider. Your application will send requests to this API, and the API will return the LLMs response.
Step 5: Build the application interface
This step involves creating the user interface part of your application. You will need to design how users will provide input to the LLM and how the LLMs output will be presented to them.
For example, if you are building a chatbot, you will need a text input field for the user and a display area for the conversation. The application code will take the user’s input, send it to the LLM via the API, receive the LLM response and display it.
Step 6: Evaluate and test
Once your application is assembled, it’s essential to test it thoroughly to ensure the LLM performs as expected for your specific use case.
By testing, we mean running the application with realistic inputs and checking if the LLMs outputs are accurate, relevant and helpful. For domain specific applications, you might have to evaluate the outputs against criteria specific to that domain. You can use evaluation datasets or even have humans evaluate the quality of the LLMs responses, especially for open ended tasks.
Step 7: Deploy and monitor
The final step is to make sure your application is available to users and ensure it continues to function correctly over time.
Deployment involves hosting your application and the LLM on servers, often using cloud platforms like AWS, Google cloud, or Azure, which offer scalable resources.
Continuously monitoring your application is key to track the performance and the LLMs behaviour and catch any issues in performance or unexpected outputs. Periodically updating or retraining the model with new data can help maintain its performance and relevance.
Challenges with building your own LLM
Computational costs: Using APIs and fine-tuning requires computational resources, which incur costs, especially at scale.
Data privacy: If your application handles sensitive data, you need to ensure that the LLM and the application comply with privacy regulations.
Debugging: Getting the LLM to perform exactly as you want can require experimentation, especially during fine-tuning or prompt engineering.
Conclusion
You don’t need a massive team or deep AI background to build an LLM app today. With clear goals, quality data, and the right tools, you can develop powerful applications that harness the capabilities of modern LLMs.
If you’re ready to build your own private LLM or need expert guidance to navigate this process, contact us today!

